This post is an overview of the process I followed to get this website going. This site was built using Pelican . As stated in the previous post, the documentation is thorough, so this won't be a tutorial on getting started. It's simply the workflow that came out of my experience with it.
Initial Site Creation
I first created a virtual environment. The Pelican docs
explain doing so using
virtualenv
. I used
venv
. Once inside the virtual environment, I installed Pelican by running
pip install "pelican[markdown]"
which is suggested if you intend to use Markdown for content creation - without the
[markdown]
included, you will have to install Markdown separately. I created a directory for my site, and from within it, I ran
pelican-quickstart
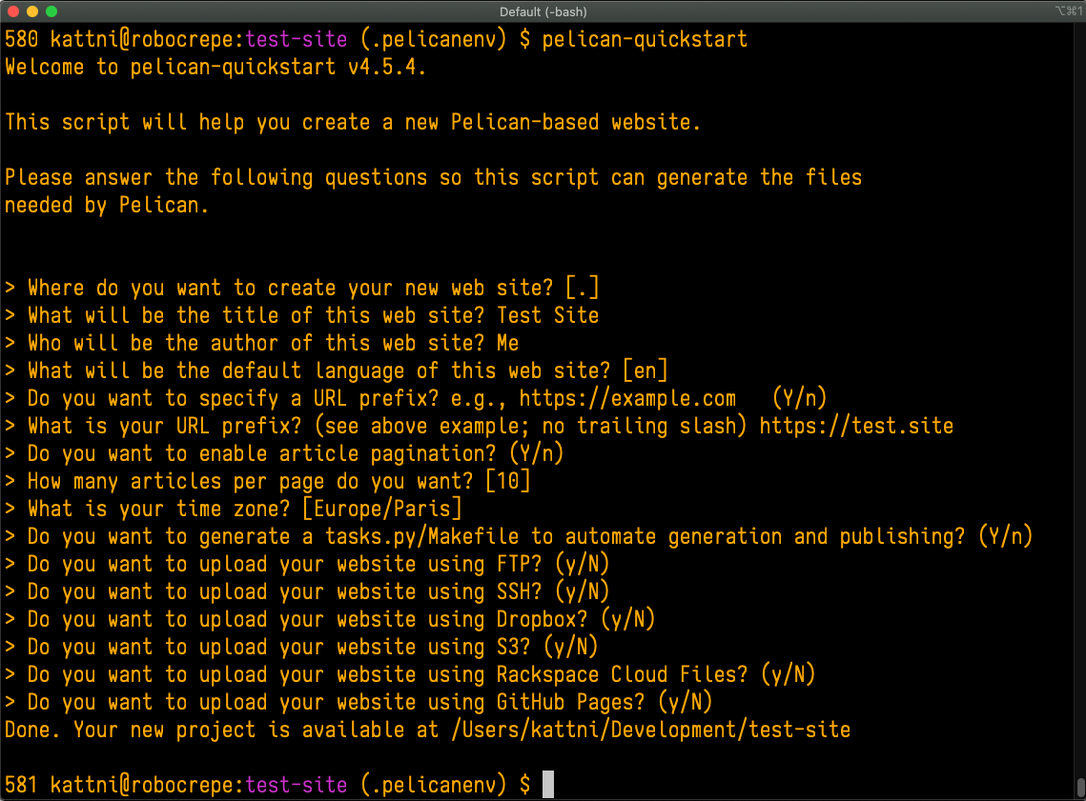
. This command creates a skeleton site by asking you a series of questions. The basic set of questions are pictured here.

Most of it is pretty self-explanatory. The only one that was a bit odd to me is that "URL prefix" is your site URL, e.g. for this site I put
https://kattni.com
. I highly recommend generating the Makefile as it became crucial to my workflow. I suggest answering
y
to one of the upload questions, and filling in the requested information, as it populates the Makefile with that info for you. I chose SSH. Bear in mind that most of the info you provide is easily updated in the config file later.
Content Creation
You cannot build the site without content, so the next step is to add a post or article. Again, the docs are useful here. However, my friend, who suggested Pelican in the first place, provided me with a script for creating new posts. I made some modifications to it; here is a link to the original. The major changes I made separate the post template into a separate file, and allow you to set the tags on file creation. I saved the script as newpost.py and the template as post_template.py .
The script:
"""Requires slugify."""
#!/usr/bin/env python
import sys
from datetime import datetime
from subprocess import call
from slugify import slugify
from post_template import TEMPLATE


def make_entry(title, tags):
    today = datetime.today()
    slug = slugify(title)
    file_create = "/Path/to/your/site/content/{}/{}_{:0>2}_{:0>2}_{}.md".format(
        today.year, today.year, today.month, today.day, slug)
    template = TEMPLATE.strip().format(title=title,
                                       year=today.year,
                                       month=today.month,
                                       day=today.day,
                                       hour=today.hour,
                                       minute=today.minute,
                                       tags=tags,
                                       slug=slug)
    with open(file_create, "w") as w:
        w.write(template)
    print("File created -> " + file_create)
    call(["pycharm", file_create])  # Opens PyCharm. Update to your editor.


if __name__ == "__main__":
    if len(sys.argv) > 1:
        make_entry(sys.argv[1], sys.argv[2])
    else:
        print("No title given")
The template:
TEMPLATE = """
Title: {title}
Date: {year}-{month}-{day} {hour}:{minute:02d}
Author: YourNameHere
Tags: {tags}
Slug: {slug}
Summary:
Status: published

"""
There's not much to it - it simply creates an empty post with the necessary metadata at the top. (Remember, I use Markdown. If you intend to use reStructuredText, you'll need to make some modifications to both files.) There are a couple of things you'll need to update for the script to work for you.
First, you need to modify the path in
newpost.py
to match the path to your site. Replace
/Path/to/your/site/
with the path to the content folder in your Pelican instance.
f_create = "/Path/to/your/site/content/{}/{}_{:0>2}_{:0>2}_{}.md".format("pycharm"
in the following line with your editor, or comment the line out.
call(["pycharm", f_create])Author: YourNameHere
with the name you want listed as the author on the post. Beyond that, check the documentation for things you can do here, such as add a tag to all posts, or add the date to the post slug, etc.
To use the script, download the file and save it wherever you'd like (I saved it in / of my site), and navigate to that directory via command line. Then, simply run the following:
This generates a file with the following in it.Title: Post Title
Date: 2021-2-6 13:55
Author: YourNameHere
Tags: Tags, Separated, By, Commas
Slug: post-title
Summary:
Status: publishedAdding a Theme
There are a decent number of
themes available for Pelican
. Once I had narrowed it down to a few, I downloaded all of them, and added them to the
/themes
folder. Pelican has a
built-in command line tool
for managing themes, but I didn't end up using it. I was initially testing them by running the
pelican
command with
-t /path/to/your/theme
to render it with each theme. Eventually, it was suggested that I add the following to my
pelicanconf.py
file:
THEME = "themes/theme-name"
At that point, to test with each theme, you simply replace
theme-name
with the name of the theme - specifically, the name of the folder in my
themes
folder. The site will then be rendered with that theme. Some themes require some settings be added to
pelicanconf.py
. Make sure those get added or the theme might not render properly. I added the settings for all possible themes, and commented out the settings that did not apply to the current theme for testing purposes.
Publishing Your Site
There are a number of ways to go about this - check the
docs
for details. I initially used the
pelican
commands to generate the content and view it. I won't get too far into the options here because my friend pointed me in the direction of
make devserver
. The
make devserver
command generates the site and creates a local webserver where you can view your site rendered at http://localhost:8000/. As long as it's running, you can make changes to your site and refresh locally, and the changes will be rendered. It is incredibly convenient when working with theming because you don't have to run anything extra to see your change, especially in my case where I was trying to tear apart a theme with my ancient CSS and HTML knowledge.
Once you have it rendering as you want it to, if you're using SSH, you can run
make rsync_upload
and it generates and syncs your local content with your remote content. The content should now be available at your URL!
Next up: problem solving!